



You do not copy a whole server folder over. Move four things, in this order: your settings, your missions, your mod list and your campaign save. The panel writes some files itself at every start, so a copied server.cfg does not behave the same here.
Do not change anything on your old server until the new one works.
If your old host gives you SFTP or FTP
The Settings page has an Import from another host card. It copies a server’s files in from your old host over SFTP or FTP: choose Import files. Read the card before you choose. A file with the same name is replaced, and in replace mode the server is emptied first. Not checked on 2.22.154089 as of 13 November 2026: how well this suits an Arma 3 server. The four steps below work without it.
Before you start
- Start the new server once and stop it. This makes the folders and
server.cfgthat the steps below need. - Players need Arma 3 and the same mods and keys as before. Nothing changes for them except the address.
- The server runs on Linux. A mod that ships its extension only as a Windows
.dll, with no_x64.so, cannot run here.
1. Settings
Open the Config Editor. It lists server.cfg, basic.cfg and Passwords. Go through your old server.cfg and set each value in the matching field. The fields show the game’s own default beside your value.
Three groups are not set in server.cfg on Loafhosts:
- Passwords. The join password, the admin password and the BattlEye RCon password are under Passwords in the Config Editor. The panel writes them into the files at every start, so a password you paste into
server.cfgis replaced. Never put them on Startup. - Max Players and Headless Clients. These are set on the Startup page and written into
server.cfgat every start. - The mission rotation (the list of missions the server plays, in order). It is kept on the Missions page (step 2).
Settings apply at the next start.
If you prefer, every file has Edit the whole file as text. Use it for a value the fields do not list, and leave the locked keys alone.
Extra command-line options of your old start line go in Extra Start Parameters on Startup. A custom start line is not available for Arma 3, so a copied line does not work. Do not put a password there.
2. Missions
- Open Files and go to
mpmissions. - Choose New, then File from Upload, and upload each mission as a
.pbofile. A mission folder goes in with Directory from Upload. Names have the formname.world, for exampleMyMission.Altis. - Open the Missions page. Your missions are under On the server. Choose Add on each one you want in the rotation, set the difficulty, and save.
The rotation applies at the next start. See server files and folders for the folder layout.
3. Mods
The easiest way is a Launcher preset. On a computer with the Arma 3 Launcher, export the preset that you use for the old server. Then:
- Open Mods, then the Presets tab.
- In Import a preset (1), choose Choose the preset file (2) and pick the file.
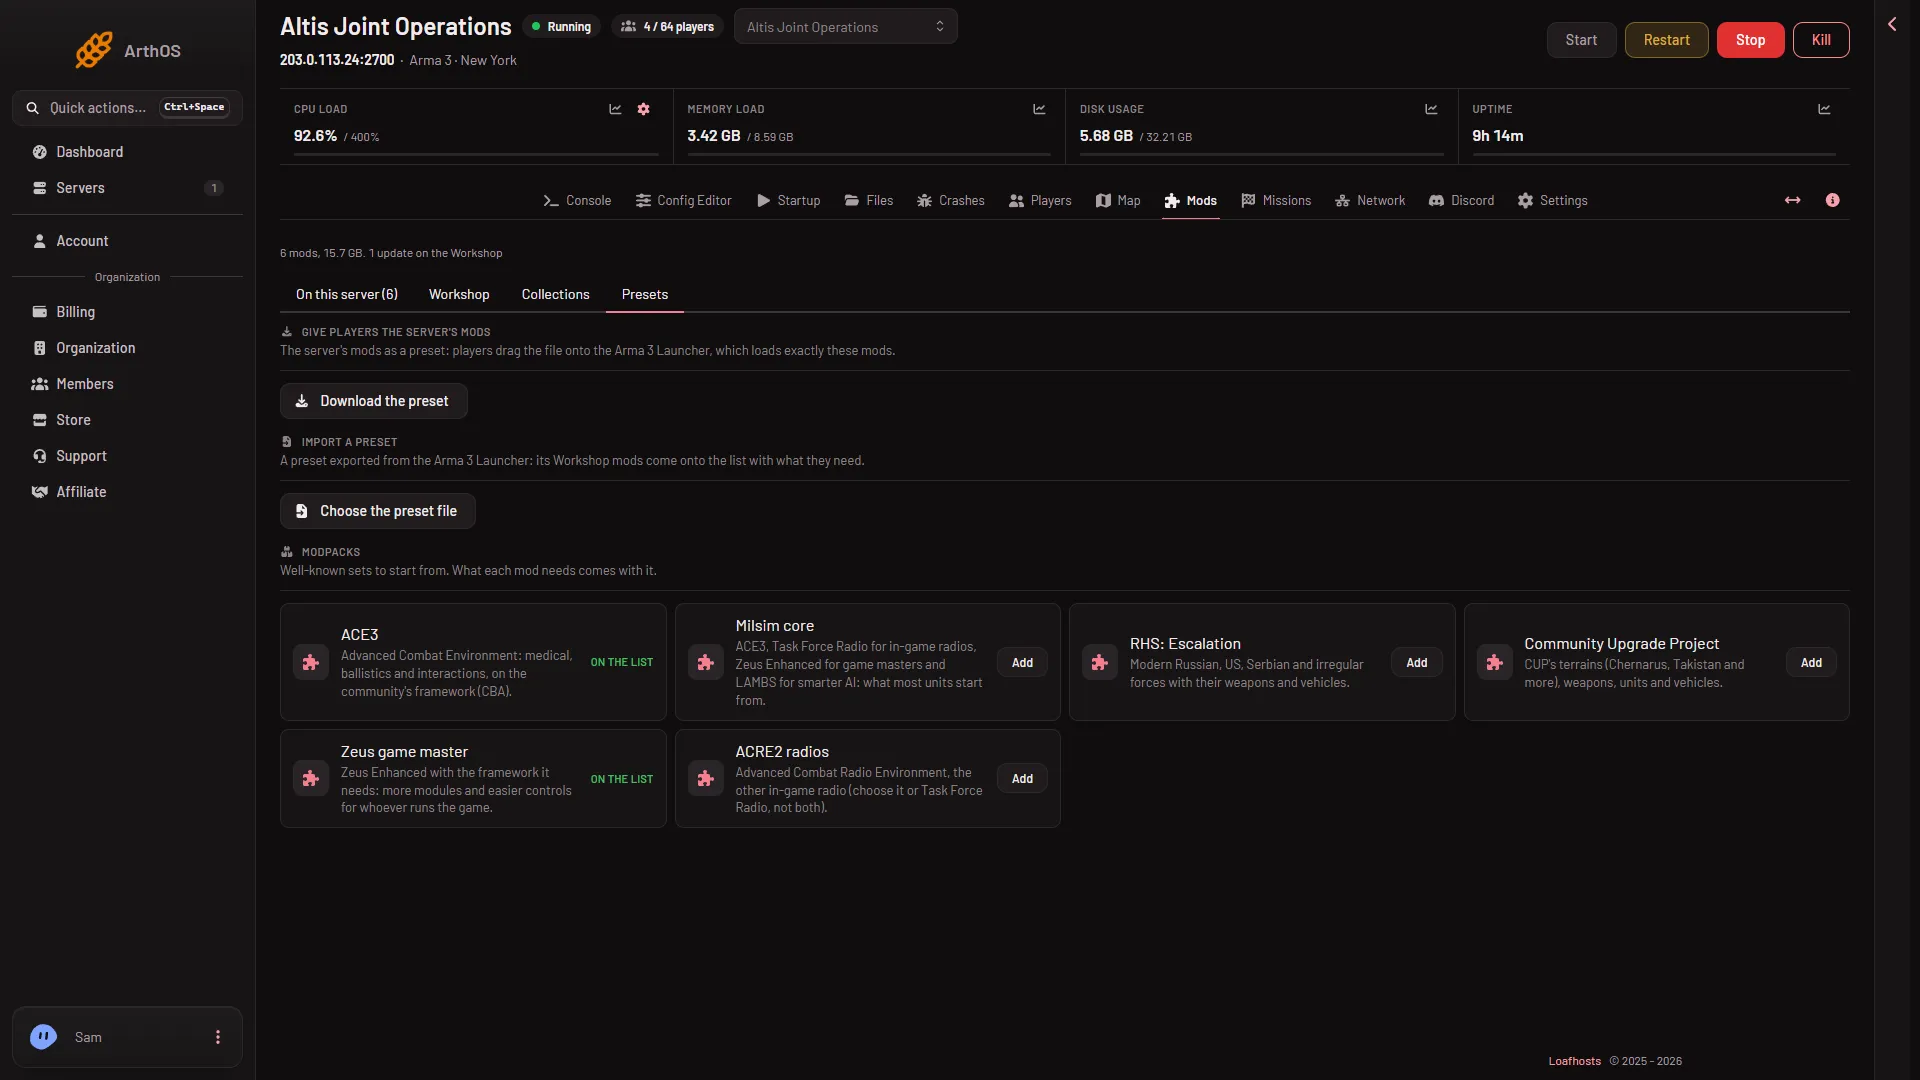
- Import a preset
- Choose the preset file
- Download the preset
- The panel shows the counts, for example “12 Workshop mods (0 already on the list), 1 DLC, 2 local mods.”
- Choose Add to the list, confirm the plan, then apply the list. The server downloads the mods and restarts. A restart disconnects everyone who is on. If players are on, send A message to everyone from the Players page first.
What the import tells you to do next:
- Local mods. A mod that is not from the Workshop is listed as “Not on the Workshop, so upload these to the server yourself”. Upload its folder to the server’s root, with a lowercase name and no spaces. Copy its
.bikeyfile intokeys. - Creator DLC. A DLC needs two things: Creator DLC Server Files switched on under Startup (the files arrive at the next update), and the DLC’s folder on the Mods list. Every player must own the DLC.
Mods that come from the Workshop have their keys copied for you. After the apply, give your players the same list with Download the preset (3) in the first card of the Presets tab: they drag the file onto the Launcher.
4. The campaign save
Campaign missions such as Antistasi and KP Liberation keep their progress in one file, Player.vars.Arma3Profile, in the server’s profile.
- Stop the server.
- In Files, upload your old
Player.vars.Arma3Profileintoserverprofile/home/Player, replacing the one there. - Start the server.
The Missions page shows it under Campaign saves as “The save in use”. Choose Copy aside there to keep a copy of it.
Check it
Open the Players page. It shows the address, whether the server has a join password, and the mission playing. Join from the Arma 3 Launcher with Direct Connect and the address shown, or find the server by its name. The name in the game’s server list is Server name in the Config Editor (server.cfg). The Rename Server card on Settings changes only the panel’s own name for the server.
If it does not work
- Players are kicked or cannot join with a mod error. The mod list or the keys differ from theirs. Compare with the preset.
- A mission is not in the list. Check the file name is
name.worldand the file is inmpmissions. - Your admin password does not work. Set it under Passwords, then restart.
- A mod does not load. See whether it ships only a Windows
.dll.
More about the game: Arma 3 servers.
Sources: Bohemia wiki: Dedicated Server, Bohemia wiki: Server Config File